IPhone 11 Pro MAX EMail Settings for Windows Hosting
IPhone 11 Pro MAX EMail Settings for Windows Hosting

Support Team
Created: 05/04/2021 3:51 PM - Updated: 10/03/2022 2:58 PM
Configure your IPhone 11 Pro MAX for Windows Hosting -
This article explains how to configure the IPhone 11 Pro MAX to send and receive emails on an email account you may have setup yourself, or has been setup for you by 123 Simples.
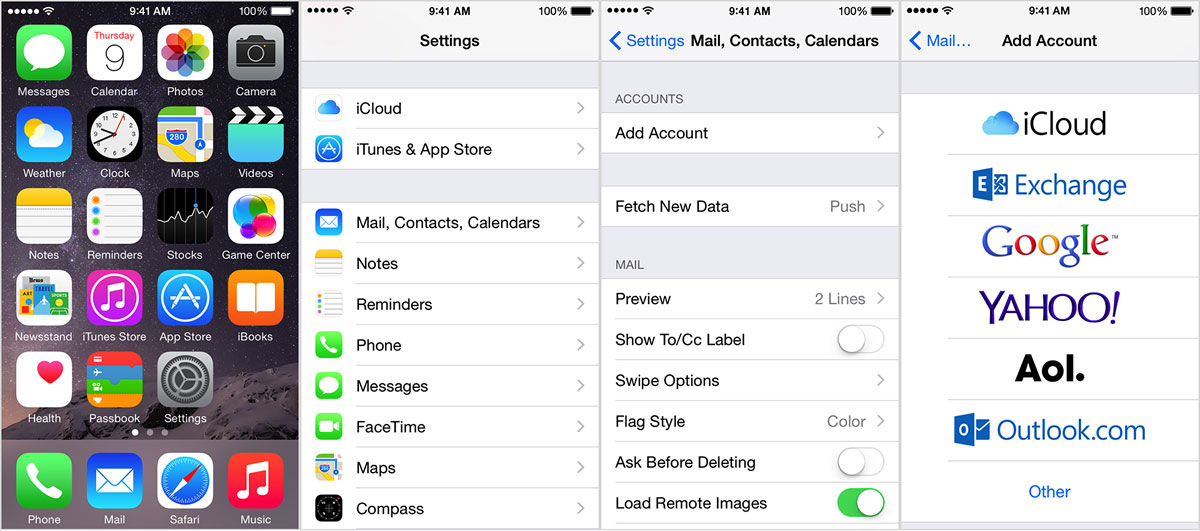
Step 1 - Go to Settings > Accounts & Passwords:
On your IPhone, find the icon called Settings, and open it.
Press Passwords & Accounts.
Press Add Account.
Choose Other from the options shown on that screen.
Press Add Mail Account.
Step 2 - Under New Account:
Press Name and key in the required sender name
Press Email and key in your email address.
Press Password and key in the password for this specific email account.
Press Description and key in the required name. In the description box type a meaningful description - for example: "My Business E-Mail"
Press Next.
Step 3 - Select Server Type:
Press IMAP.
Press Host Name and key in the imap server name - imap.WebSiteLive.net.
Press Username and key in your email account address.
Enter outgoing server -
Press Host Name and key in the smtp server name - smtp.WebSiteLive.net.
Press Username and key in your email account address again.
Press Password and key in the password again for this specific email account.
Press Next.
Press Save. Your email account has now been set up. To select more settings for incoming and outgoing server, proceed with the following steps.
Step 4 - Finalising the Server Settings:
Press the name of the email account you've just set up.
Press Account.
Turn off encryption of outgoing email messages.
Press SMTP.
Press the field below "PRIMARY SERVER".
Press the indicator next to "Use SSL" to turn off the function. Turn off password encryption.
Press Authentication.
Press Password.
Press arrow left.
Enter outgoing port.
Press Server Port and key in 587.
Press Done.
Press arrow left.
Turn off encryption of incoming email messages.
Press Advanced.
Press the indicator next to "Use SSL" to turn off the function.
Turn off password encryption.
Press Authentication.
Press Password.
Press arrow left.
Enter incoming port.
Press Server Port and key in 143.
Press arrow left.
Press Done.
Press arrow left.
Select setting for retrieval of new email messages.
Press Fetch New Data.
Press the indicator next to "Push" to turn the function on or off.
If you turn off the function, press the required setting.
Press the required email account and follow the instructions on the screen to select settings for the specific account.
Return to the home screen.
Slide your finger upwards starting from the bottom of the screen to return to the home screen.